KernelMind Data Converter Guide
KernelMind Data Converter is a conversion tool for teleoperation and robot datasets. Teleoperation data is recorded by default to a USB drive labeled BAG_STORAGE under /media/<user>/BAG_STORAGE/recorded_bags. The tool organizes MCAP files, camera videos, and timestamp information from the my_bag-* directories into trainable LeRobot v3 datasets. It also provides an Electron desktop UI for path selection, video stream mapping, end-effector selection, LeRobot Schema configuration, conversion progress, and Rerun visualization.
Core Features
- Run the full pipeline in one click: split
cameras.mp4, convert MCAP, align video with robot state, and export a LeRobot Dataset. - Support custom mapping for 2x2 stitched videos. One or more video streams from
left_eye,right_eye,left_wrist, andright_wristcan be written to the dataset. - Support
grippergripper mode andhanddexterous hand mode. - Support configurable LeRobot
actionandobservation.statecomposition order. The UI displays topic count and total dimensions in real time. - Built-in live logs, log export, pause, resume, and stop conversion.
- Built-in Rerun Web Viewer for
.mcap,.rrd,.rbl, or LeRobot dataset directories. Native Rerun can also be opened. - Provides the raw data quality check command
quality-check, which can generate quality reports before conversion.
Raw Data Directory Requirements
On Linux, the USB drive is mounted by default at /media/<user>/BAG_STORAGE, and recordings are stored in its recorded_bags subdirectory. Select recorded_bags as the Data Converter input. It must contain one or more my_bag-* episode directories:
BAG_STORAGE/
  recorded_bags/
    my_bag-yy-MM-dd-HH-mm-ss/
      data/
        data_0.mcap
        metadata.yaml
      video/
        cameras.mp4
        cameras_first_frame.yaml
Key files:
| File | Purpose |
|---|---|
data/data_0.mcap | Raw ROS / robot state recording. |
data/metadata.yaml | Recording metadata. If it is missing, first check whether recording ended normally. |
video/cameras.mp4 | 2x2 camera video. |
video/cameras_first_frame.yaml | Absolute timestamp of the first frame. The file must contain first_frame_time.epoch_ns. |
Episode directory names must start with my_bag-. The final generated dataset directory is named with the earliest episode timestamp.
When reading the USB drive directly on Windows, if its drive letter is D:, the converter input is normally D:\recorded_bags, not D:\BAG_STORAGE.
Pre-Conversion Quality Check
Before conversion, check the directory structure, raw recordings, and required topics in each my_bag-* episode and write reports to the selected output directory:
python -m km_data_converter quality-check ^
  --input D:\recorded_bags ^
  --output D:\output\km_dataset
Reports are written to D:\output\km_dataset\quality_report. To require additional topics, pass --required-topic more than once:
python -m km_data_converter quality-check ^
  --input D:\recorded_bags ^
  --output D:\output\km_dataset ^
  --required-topic /joint_states ^
  --required-topic /control/joint_cmd_A
Use --rules <rules.yaml> to load custom rules. Add --replace-rules when the custom rule file should completely replace the default rules.
Installation
Python 3.10 to 3.12 is recommended.
pip install -e .
pip install rerun-sdk[all]
pip install -e .\examples\python\rerun_export
Start The Desktop UI
The desktop app is located in km_data_converter_UI and uses Electron + Vite + React.
cd .\km_data_converter_UI
npm install
npm run build
npm run dev
node_modules/ is created by npm install. dist/.
dist-electron/ are build outputs created by commands such as npm run build.
After startup, the UI opens the KernelMind Data Converter window.
5-Step Frontend Workflow
1. Input Paths
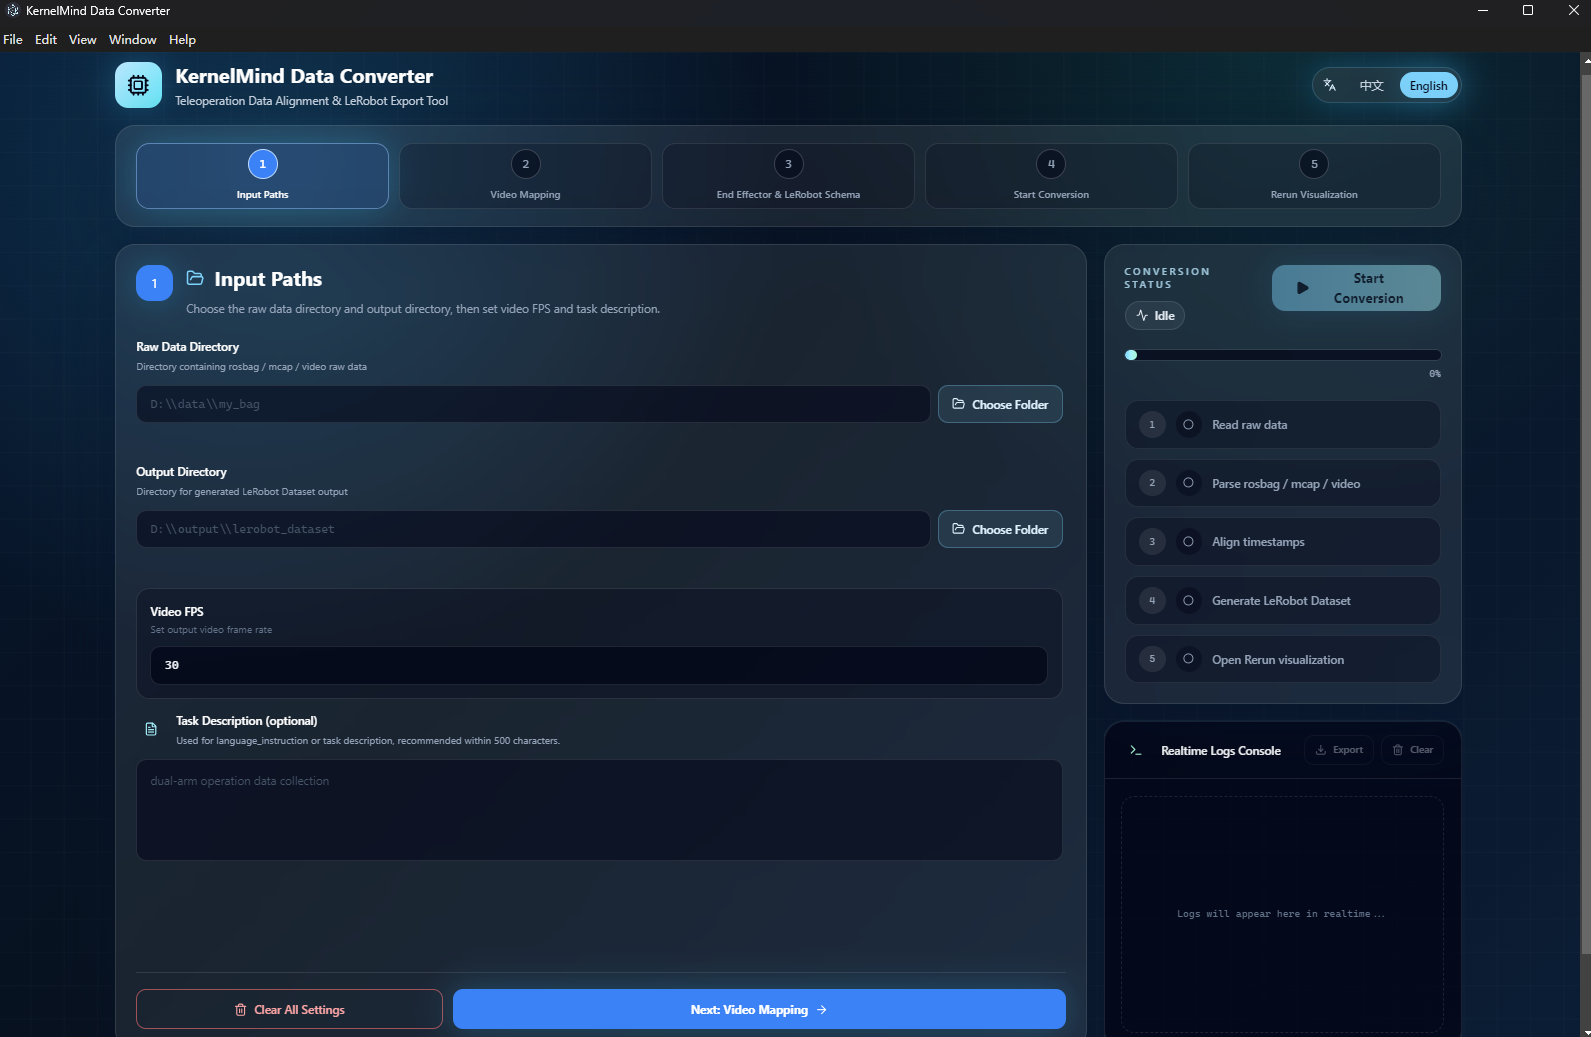
Fill in or select the following in Input Paths:
- Raw data directory: the
recorded_bagsdirectory on the USB drive containingmy_bag-*. The default Linux path is/media/<user>/BAG_STORAGE/recorded_bags. - Output directory: intermediate RRD files, config files, and the final LeRobot dataset are written here.
- Video FPS: output FPS for split videos. The UI default is
30. It is recommended to set the output video FPS lower than the original video FPS. - Task description: optional task text written to the final dataset.
2. Video Stream Mapping
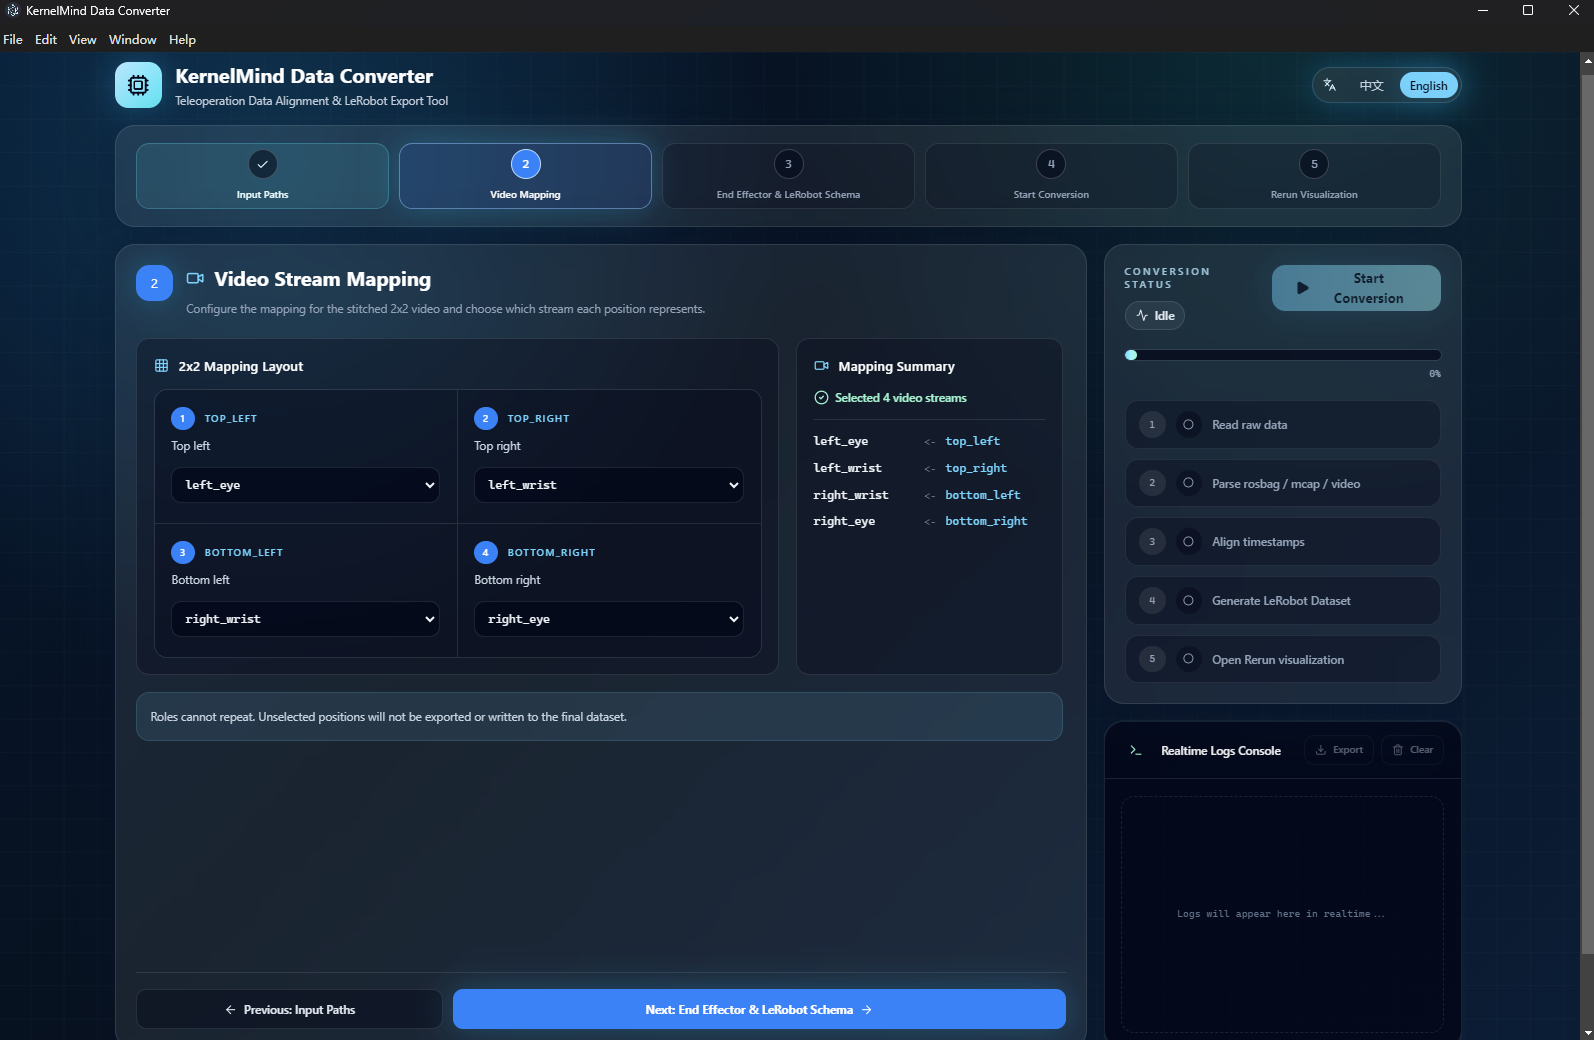
The tool treats video/cameras.mp4 as a 2x2 frame and splits it into independent videos according to the mapping.
Available positions:
top_left       top_right
bottom_left    bottom_right
Available video roles:
None / unused
left_eye
right_eye
left_wrist
right_wrist
Default mapping:
{
  "video_streams": [
    { "grid": "top_left", "role": "left_eye" },
    { "grid": "top_right", "role": "left_wrist" },
    { "grid": "bottom_left", "role": "right_wrist" },
    { "grid": "bottom_right", "role": "right_eye" }
  ]
}
Notes:
gridcannot be duplicated.rolecannot be duplicated.- At least one video stream must be selected.
- Unselected positions are not split, are not written to
video2rrd, and are not included in the final LeRobot dataset.
3. End Effector And LeRobot Schema
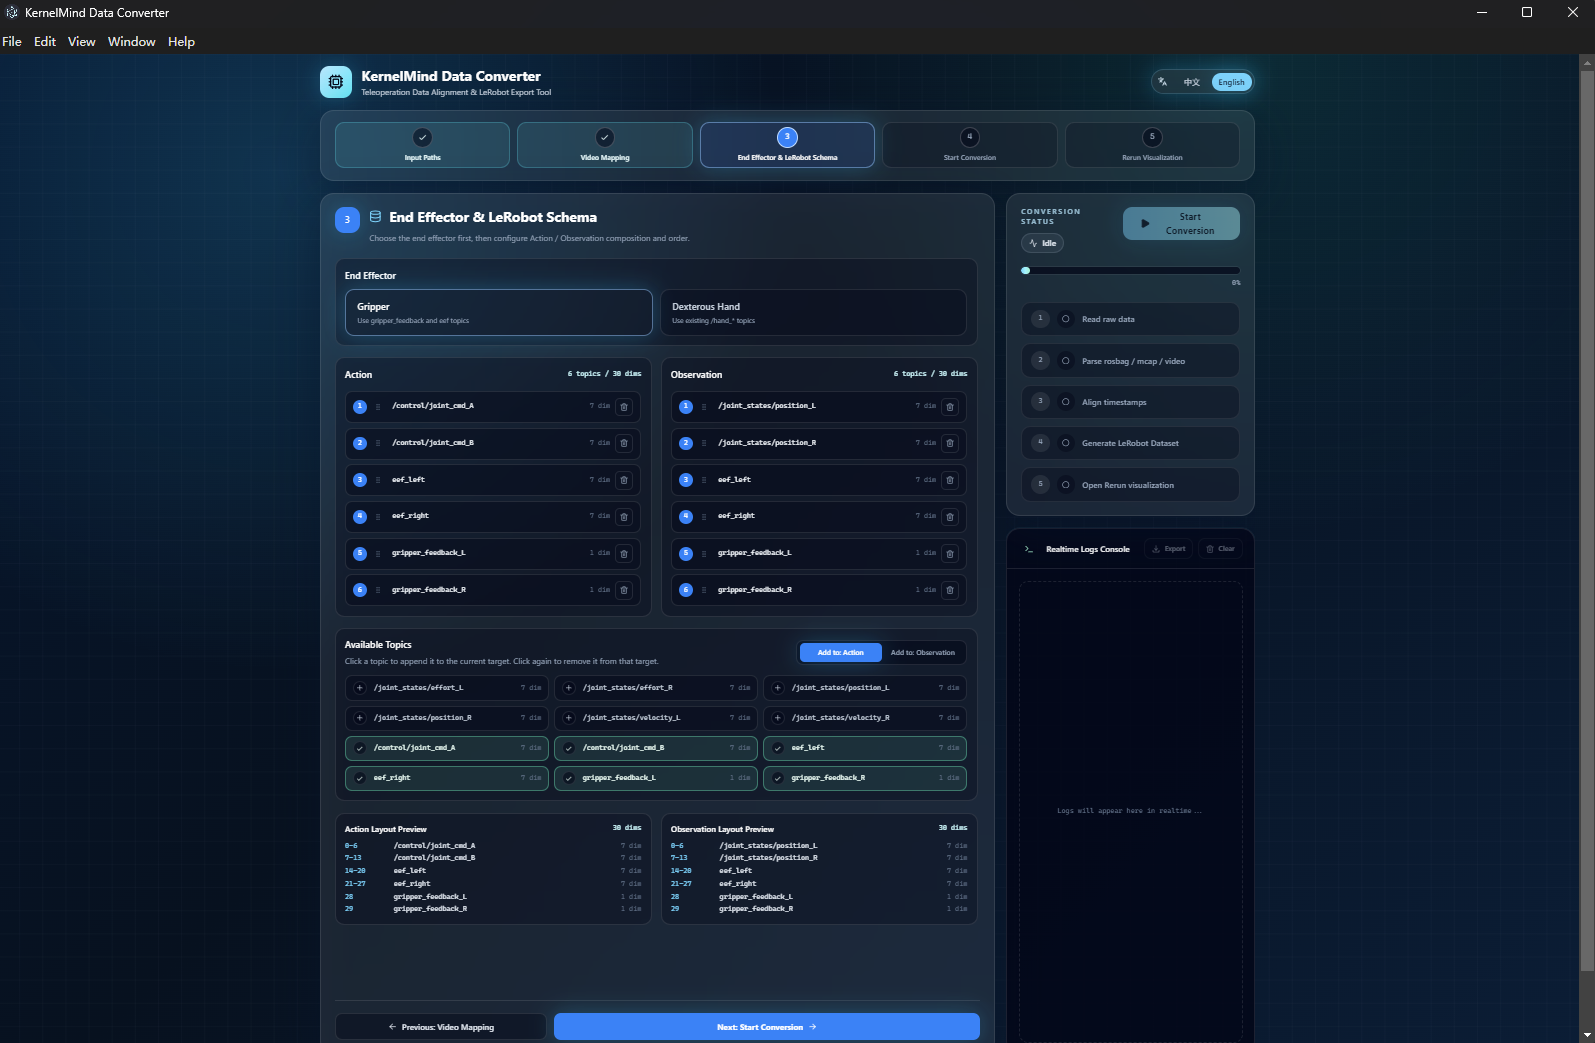
First select the end-effector type:
| Type | Use case | Related topic |
|---|---|---|
gripper | Default gripper mode | gripper_feedback_L, gripper_feedback_R |
hand | Dexterous hand mode | /hand_left/*, /hand_right/* |
Then configure the LeRobot action and observation.state. The UI supports adding or removing topics from the available topic list and previews each segment's dimension range in the vector in real time.
Default gripper schema:
{
  "action": [
    "/control/joint_cmd_A",
    "/control/joint_cmd_B",
    "eef_left",
    "eef_right",
    "gripper_feedback_L",
    "gripper_feedback_R"
  ],
  "observation": [
    "/joint_states/position_L",
    "/joint_states/position_R",
    "eef_left",
    "eef_right",
    "gripper_feedback_L",
    "gripper_feedback_R"
  ]
}
Default dexterous hand schema:
{
  "action": [
    "/control/joint_cmd_A",
    "/control/joint_cmd_B",
    "eef_left",
    "eef_right",
    "/hand_left/joint_commands/position",
    "/hand_right/joint_commands/position"
  ],
  "observation": [
    "/joint_states/position_L",
    "/joint_states/position_R",
    "eef_left",
    "eef_right",
    "/hand_left/joint_states/position",
    "/hand_right/joint_states/position",
    "/hand_left/joint_states/effort",
    "/hand_right/joint_states/effort"
  ]
}
Available topic dimensions:
| Topic | Dimensions |
|---|---|
/joint_states/effort_L, /joint_states/effort_R | 7 |
/joint_states/position_L, /joint_states/position_R | 7 |
/joint_states/velocity_L, /joint_states/velocity_R | 7 |
/control/joint_cmd_A, /control/joint_cmd_B | 7 |
eef_left, eef_right | 7 |
gripper_feedback_L, gripper_feedback_R | 1 |
/hand_left/joint_commands/position, /hand_right/joint_commands/position | 20 |
/hand_left/joint_states/position, /hand_right/joint_states/position | 20 |
/hand_left/joint_states/effort, /hand_right/joint_states/effort | 20 |
Implementation details:
/joint_states/*_Land/joint_states/*_Rcome from splitting a 14-dimensional joint state vector into left and right 7-dimensional parts.eef_leftandeef_rightuse position and quaternion, for 7 dimensions in total.gripper_feedback_Landgripper_feedback_Ruse the gripper end travel, for 1 dimension in total.
4. Start Conversion
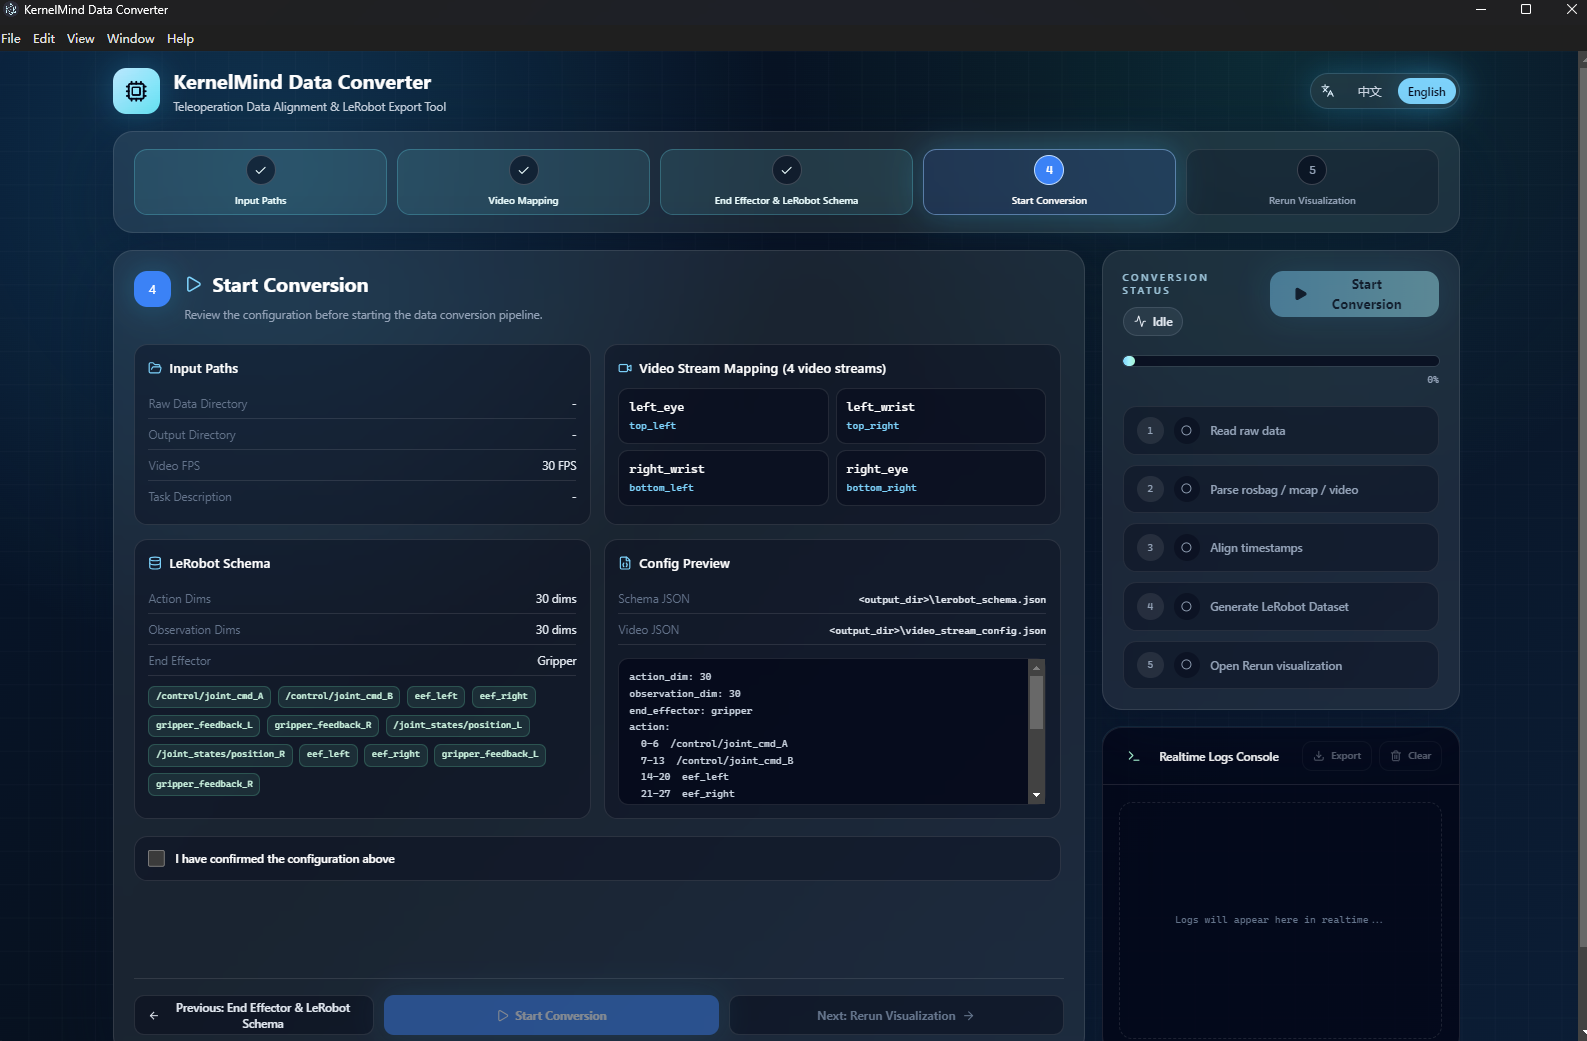
Before starting, the UI displays:
- Input path, output path, FPS, and task description.
- Number of video stream mappings and the specific
role <- grid. - Total Action / Observation dimensions.
- Paths of the config files that will be written.
After checking I have confirmed the configuration above, conversion can be started. The status panel on the right displays stage progress:
- Read raw data
- Parse rosbag / mcap / video
- Timestamp alignment
- Generate LeRobot Dataset
- Open Rerun visualization
During conversion, you can use:
- Pause: suspend the current conversion process.
- Resume: resume the paused conversion.
- Stop conversion: terminate the current conversion process tree.
- Export logs: save the current live logs to
conversion_logs_*.txtin the output directory.
5. Rerun Visualization
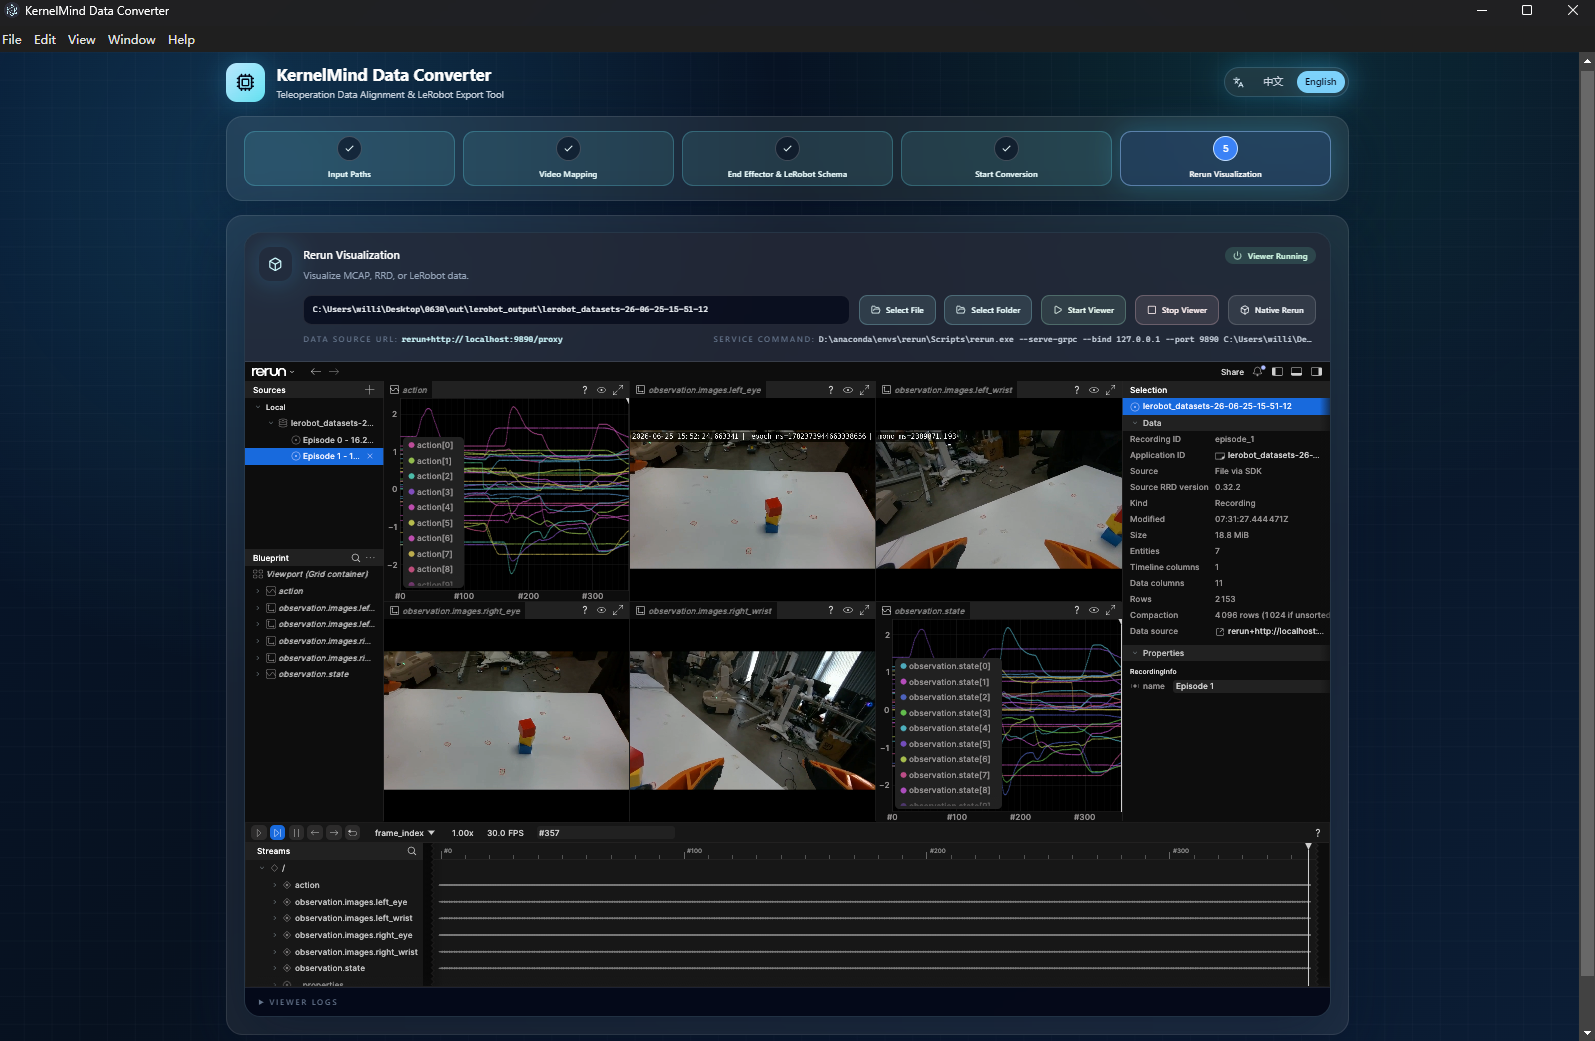
After conversion succeeds, enter the Rerun Visualization page. It supports selecting or entering:
.mcap.rrd.rbl- LeRobot dataset directory
After clicking Start Viewer, the desktop app starts the Rerun gRPC data service. The default data source address is similar to:
rerun+http://localhost:9876/proxy
The UI embeds Rerun Web Viewer for inspection. You can also click Native Rerun to open it with the system rerun command.
Output Directory Structure
Assuming the output directory selected in the UI is D:\output\km_dataset, conversion generates:
D:\output\km_dataset\
  lerobot_schema.json
  video_stream_config.json
  mcap2rrd\
    mcap_to_rrd\
      my_bag-yy-MM-dd-HH-mm-ss\
        mcap2rrd.rrd
  video2rrd\
    video2rrd-yy-MM-dd-HH-mm-ss.rrd
  lerobot_output\
    lerobot_datasets-yy-MM-dd-HH-mm-ss\
      data\
      meta\
        stats.json
      videos\
Description:
lerobot_schema.jsonrecords the finalactionandobservationtopic order.video_stream_config.jsonrecords the mapping from 2x2 video positions to cameras.mcap2rrdstores intermediate results exported from the raw MCAP state.video2rrdstores each episode RRD after video and robot state alignment.lerobot_output/lerobot_datasets-*is the final trainable dataset.
The final generated LeRobot-format dataset is named with the earliest episode timestamp.
Rerun Command Line Viewing
If you do not use the embedded desktop Viewer, you can also run:
rerun D:\output\km_dataset\lerobot_output\lerobot_datasets-yy-MM-dd-HH-mm-ss
Project Reference
- KLMmotion/KM_data_converter (
data_converterbranch): converter source, desktop UI, and latest project documentation.